Appearance
Spring异步调用@Async
内容来源:本篇为学习整理,转载自网络技术博客(版权归原作者所有):
看在前面
我们经常在需要提升性能或项目解耦时用线程池异步执行任务,比如直接用 ThreadPoolExecutor 创建线程池;Spring 则提供了 @Async 注解,让我们以声明式的方式完成同样的事情。
原理一句话概括:Spring 扫描到方法上有 @Async 注解时,会为这个 bean 动态生成代理类(CGLib 继承原类)。外部调用该方法时进入代理,由 AsyncExecutionInterceptor 把方法提交给线程池执行,而不是在调用线程里直接执行——本质上就是 AOP 动态代理的一种应用(下文有源码分析)。这也解释了为什么同一个类内部的方法调用会让 @Async 失效:内部调用走的是类自身的 this,不经过代理,Spring 拦截不到。异步请求与异步调用的更多辨析见 异步请求与异步调用的区别。
一、spring 异步任务
估计或多或少了解过一些,比如@EnableAsync可以启用异步任务。@Async用于注解说明当前方法是异步执行。下面使用demo看看Spring的异步任务如何执行。pom依赖仅依赖Spring core context 就可以了。这里演示,另外spring boot还要许多好玩的特性。
java
<dependencies>
	<dependency>
		<groupId>org.springframework.boot</groupId>
		<artifactId>spring-boot-starter-web</artifactId>
		<version>2.1.3.RELEASE</version>
	</dependency>
	<dependency>
		<groupId>org.springframework.boot</groupId>
		<artifactId>spring-boot-starter-test</artifactId>
		<version>2.1.3.RELEASE</version>
		<scope>test</scope>
	</dependency>
</dependencies>
java
@RestController
@SpringBootApplication
public class AsyncMain {
    public static void main(String[] args) {
        SpringApplication.run(AsyncMain.class, args);
    }

    @Autowired
    private TaskService taskService;

    @RequestMapping(value = "/async-task", method = RequestMethod.GET)
    public String asyncMapping(){
        System.out.println(Thread.currentThread().getThreadGroup() + "http-------" + Thread.currentThread().getName());
        taskService.doTask();
        return "exec http ok--------------";
    }
}
java
@EnableAsync
@Service
public class TaskService {

    @Async
    public String doTask(){
        System.out.println(Thread.currentThread().getThreadGroup() + "-------" + Thread.currentThread().getName());
        return "do task done";
    }
}
运行main方法,访问localhost:8080/async-task,控制台可以看到:
java
2020-03-18 15:51:56.378  INFO 18036 --- [nio-8080-exec-3]
java.lang.ThreadGroup[name=main,maxpri=10]-------task-1
可以看到线程的name是task-1,而http访问的线程是http-nio-xxx。说明任务异步执行了。我们也并未创建线程池,是Spring替我们创建了。下面分析Spring的异步任务执行过程。
二、Spring boot异步任务执行过程分析
首先,需要执行异步任务,必须创建线程池,那我们来揪出Spring创建的线程池,从启动日志可以看出
java
2020-03-18 15:51:15.861 INFO 18036 --- [ main] o.s.s.concurrent.ThreadPoolTaskExecutor : Initializing ExecutorService 'applicationTaskExecutor'Spring默认给我们创建了applicationTaskExecutor的ExecutorService的线程池。通过源码分析,Spring boot的starter已经给我们设置了默认的执行器
java
/**
 * {@link EnableAutoConfiguration Auto-configuration} for {@link TaskExecutor}.
 *
 * @author Stephane Nicoll
 * @author Camille Vienot
 * @since 2.1.0
 */
@ConditionalOnClass(ThreadPoolTaskExecutor.class)
@Configuration
@EnableConfigurationProperties(TaskExecutionProperties.class)
public class TaskExecutionAutoConfiguration {

	/**
	 * Bean name of the application {@link TaskExecutor}.
	 */
	public static final String APPLICATION_TASK_EXECUTOR_BEAN_NAME = "applicationTaskExecutor";

	private final TaskExecutionProperties properties;

	private final ObjectProvider<TaskExecutorCustomizer> taskExecutorCustomizers;

	private final ObjectProvider<TaskDecorator> taskDecorator;

	public TaskExecutionAutoConfiguration(TaskExecutionProperties properties,
			ObjectProvider<TaskExecutorCustomizer> taskExecutorCustomizers,
			ObjectProvider<TaskDecorator> taskDecorator) {
		this.properties = properties;
		this.taskExecutorCustomizers = taskExecutorCustomizers;
		this.taskDecorator = taskDecorator;
	}

	@Bean
	@ConditionalOnMissingBean
	public TaskExecutorBuilder taskExecutorBuilder() {
		TaskExecutionProperties.Pool pool = this.properties.getPool();
		TaskExecutorBuilder builder = new TaskExecutorBuilder();
		builder = builder.queueCapacity(pool.getQueueCapacity());
		builder = builder.corePoolSize(pool.getCoreSize());
		builder = builder.maxPoolSize(pool.getMaxSize());
		builder = builder.allowCoreThreadTimeOut(pool.isAllowCoreThreadTimeout());
		builder = builder.keepAlive(pool.getKeepAlive());
		builder = builder.threadNamePrefix(this.properties.getThreadNamePrefix());
		builder = builder.customizers(this.taskExecutorCustomizers);
		builder = builder.taskDecorator(this.taskDecorator.getIfUnique());
		return builder;
	}

	@Lazy
	@Bean(name = { APPLICATION_TASK_EXECUTOR_BEAN_NAME,
			AsyncAnnotationBeanPostProcessor.DEFAULT_TASK_EXECUTOR_BEAN_NAME })
	@ConditionalOnMissingBean(Executor.class)
	public ThreadPoolTaskExecutor applicationTaskExecutor(TaskExecutorBuilder builder) {
		return builder.build();
	}

}
追根溯源:在Spring boot的autoconfigure中已经定义了默认实现,找到spring-boot-autoconfigure-2.1.3.RELEASE.jar打开META-INF/spring.factories文件
java
org.springframework.boot.autoconfigure.task.TaskExecutionAutoConfiguration,\
org.springframework.boot.autoconfigure.task.TaskSchedulingAutoConfiguration,\
Spring为我们定义了两种实现,如上所示。根据Spring boot的配置定律,我们可以通过配置来定义异步任务的参数。
java
/**
 * Configuration properties for task execution.
 *
 * @author Stephane Nicoll
 * @since 2.1.0
 */
@ConfigurationProperties("spring.task.execution")
public class TaskExecutionProperties {

	private final Pool pool = new Pool();

	/**
	 * Prefix to use for the names of newly created threads.
	 */
	private String threadNamePrefix = "task-";

	public Pool getPool() {
		return this.pool;
	}

	public String getThreadNamePrefix() {
		return this.threadNamePrefix;
	}

	public void setThreadNamePrefix(String threadNamePrefix) {
		this.threadNamePrefix = threadNamePrefix;
	}

	public static class Pool {

		/**
		 * Queue capacity. An unbounded capacity does not increase the pool and therefore
		 * ignores the "max-size" property.
		 */
		private int queueCapacity = Integer.MAX_VALUE;

		/**
		 * Core number of threads.
		 */
		private int coreSize = 8;

		/**
		 * Maximum allowed number of threads. If tasks are filling up the queue, the pool
		 * can expand up to that size to accommodate the load. Ignored if the queue is
		 * unbounded.
		 */
		private int maxSize = Integer.MAX_VALUE;

		/**
		 * Whether core threads are allowed to time out. This enables dynamic growing and
		 * shrinking of the pool.
		 */
		private boolean allowCoreThreadTimeout = true;

		/**
		 * Time limit for which threads may remain idle before being terminated.
		 */
		private Duration keepAlive = Duration.ofSeconds(60);

		public int getQueueCapacity() {
			return this.queueCapacity;
		}

		public void setQueueCapacity(int queueCapacity) {
			this.queueCapacity = queueCapacity;
		}

		public int getCoreSize() {
			return this.coreSize;
		}

		public void setCoreSize(int coreSize) {
			this.coreSize = coreSize;
		}

		public int getMaxSize() {
			return this.maxSize;
		}

		public void setMaxSize(int maxSize) {
			this.maxSize = maxSize;
		}

		public boolean isAllowCoreThreadTimeout() {
			return this.allowCoreThreadTimeout;
		}

		public void setAllowCoreThreadTimeout(boolean allowCoreThreadTimeout) {
			this.allowCoreThreadTimeout = allowCoreThreadTimeout;
		}

		public Duration getKeepAlive() {
			return this.keepAlive;
		}

		public void setKeepAlive(Duration keepAlive) {
			this.keepAlive = keepAlive;
		}

	}

}
spring boot的配置以spring.task.execution开头,参数的设置参考如上源码的属性设置。各位可以自行尝试,当然因为Spring bean的定义方式,我们可以复写bean来达到自定义的目的
java
@Lazy
@Bean(name = { APPLICATION_TASK_EXECUTOR_BEAN_NAME,
		AsyncAnnotationBeanPostProcessor.DEFAULT_TASK_EXECUTOR_BEAN_NAME })
@ConditionalOnMissingBean(Executor.class)
public ThreadPoolTaskExecutor applicationTaskExecutor(TaskExecutorBuilder builder) {
	return builder.build();
}
比如:
java
@Configuration
@EnableAsync
public class TaskAsyncConfig {

    @Bean
    public Executor initExecutor(){
        ThreadPoolTaskExecutor executor = new ThreadPoolTaskExecutor();
        //定制线程名称,还可以定制线程group
        executor.setThreadFactory(new ThreadFactory() {
            private final AtomicInteger threadNumber = new AtomicInteger(1);

            @Override
            public Thread newThread(Runnable r) {
                Thread t = new Thread(Thread.currentThread().getThreadGroup(), r,
                        "async-task-" + threadNumber.getAndIncrement(),
                        0);
                return t;
            }
        });
        executor.setCorePoolSize(10);
        executor.setMaxPoolSize(20);
        executor.setKeepAliveSeconds(5);
        executor.setQueueCapacity(100);
        executor.setRejectedExecutionHandler(null);
        return executor;
    }
}
重启,访问localhost:8080/async-task,证明我们写的Executor已经覆盖系统默认了。
java
Thread t = new Thread(Thread.currentThread().getThreadGroup(), r,
                        "async-task-" + threadNumber.getAndIncrement(),
                        0);
java
java.lang.ThreadGroup[name=main,maxpri=10]-------async-task-1三、Spring 异步任务执行过程分析
方法断点跟踪
java
@EnableAsync
@Service
public class TaskService {

    @Async
    public String doTask(){
        System.out.println(Thread.currentThread().getThreadGroup() + "-------" + Thread.currentThread().getName());
        return "do task done";
    }
}
执行异步任务使用Spring CGLib动态代理AOP实现
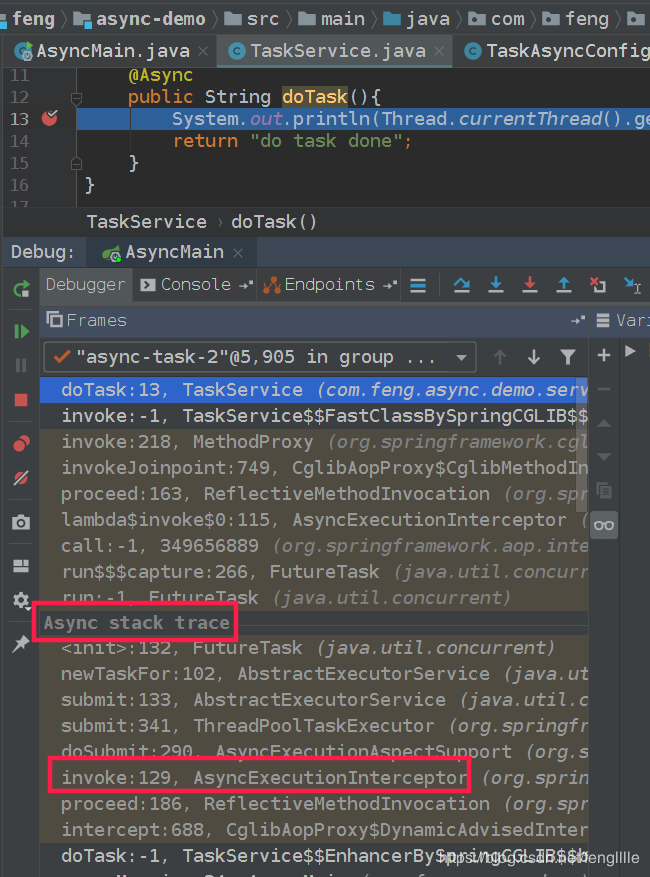
可以看出动态代理后使用AsyncExecutionInterceptor来处理异步逻辑,执行submit方法
java
/**
 * Intercept the given method invocation, submit the actual calling of the method to
 * the correct task executor and return immediately to the caller.
 * @param invocation the method to intercept and make asynchronous
 * @return {@link Future} if the original method returns {@code Future}; {@code null}
 * otherwise.
 */
@Override
@Nullable
public Object invoke(final MethodInvocation invocation) throws Throwable {
	Class<?> targetClass = (invocation.getThis() != null ? AopUtils.getTargetClass(invocation.getThis()) : null);
	Method specificMethod = ClassUtils.getMostSpecificMethod(invocation.getMethod(), targetClass);
	final Method userDeclaredMethod = BridgeMethodResolver.findBridgedMethod(specificMethod);

	AsyncTaskExecutor executor = determineAsyncExecutor(userDeclaredMethod);
	if (executor == null) {
		throw new IllegalStateException(
				"No executor specified and no default executor set on AsyncExecutionInterceptor either");
	}

	Callable<Object> task = () -> {
		try {
			Object result = invocation.proceed();
			if (result instanceof Future) {
				return ((Future<?>) result).get();
			}
		}
		catch (ExecutionException ex) {
			handleError(ex.getCause(), userDeclaredMethod, invocation.getArguments());
		}
		catch (Throwable ex) {
			handleError(ex, userDeclaredMethod, invocation.getArguments());
		}
		return null;
	};

	return doSubmit(task, executor, invocation.getMethod().getReturnType());
}
AsyncExecutionAspectSupport类中doSubmit方法
java
/**
 * Delegate for actually executing the given task with the chosen executor.
 * @param task the task to execute
 * @param executor the chosen executor
 * @param returnType the declared return type (potentially a {@link Future} variant)
 * @return the execution result (potentially a corresponding {@link Future} handle)
 */
@Nullable
protected Object doSubmit(Callable<Object> task, AsyncTaskExecutor executor, Class<?> returnType) {
	if (CompletableFuture.class.isAssignableFrom(returnType)) {
		return CompletableFuture.supplyAsync(() -> {
			try {
				return task.call();
			}
			catch (Throwable ex) {
				throw new CompletionException(ex);
			}
		}, executor);
	}
	else if (ListenableFuture.class.isAssignableFrom(returnType)) {
		return ((AsyncListenableTaskExecutor) executor).submitListenable(task);
	}
	else if (Future.class.isAssignableFrom(returnType)) {
		return executor.submit(task);
	}
	else {
		executor.submit(task);
		return null;
	}
}
并且在AsyncExecutionAspectSupport类中可知默认的defaultExecutor和exceptionHandler如下所示。即默认的taskExecutor使用BeanFactory中获取,并且默认使用SimpleAsyncUncaughtExceptionHandler处理异步异常。
java
/**
 * Configure this aspect with the given executor and exception handler suppliers,
 * applying the corresponding default if a supplier is not resolvable.
 * @since 5.1
 */
public void configure(@Nullable Supplier<Executor> defaultExecutor,
		@Nullable Supplier<AsyncUncaughtExceptionHandler> exceptionHandler) {

	this.defaultExecutor = new SingletonSupplier<>(defaultExecutor, () -> getDefaultExecutor(this.beanFactory));
	this.exceptionHandler = new SingletonSupplier<>(exceptionHandler, SimpleAsyncUncaughtExceptionHandler::new);
}
演示默认异常处理器效果SimpleAsyncUncaughtExceptionHandler
java
@EnableAsync
@Service
public class TaskService {

    @Async
    public String doTask(){
        System.out.println(Thread.currentThread().getThreadGroup() + "-------" + Thread.currentThread().getName());
        throw new RuntimeException(" I`m a demo test exception-----------------");
    }
}
默认会打印logger.error("Unexpected exception occurred invoking async method: " + method, ex);日志
java
/**
 * A default {@link AsyncUncaughtExceptionHandler} that simply logs the exception.
 *
 * @author Stephane Nicoll
 * @author Juergen Hoeller
 * @since 4.1
 */
public class SimpleAsyncUncaughtExceptionHandler implements AsyncUncaughtExceptionHandler {

	private static final Log logger = LogFactory.getLog(SimpleAsyncUncaughtExceptionHandler.class);


	@Override
	public void handleUncaughtException(Throwable ex, Method method, Object... params) {
		if (logger.isErrorEnabled()) {
			logger.error("Unexpected exception occurred invoking async method: " + method, ex);
		}
	}

}
运行测试
java
2020-03-18 17:06:53.337 ERROR 24944 --- [   async-task-1] .a.i.SimpleAsyncUncaughtExceptionHandler : Unexpected exception occurred invoking async method: public void com.hikvision.datamanagerservice.mq.async.AsyncSendMQHandler.asyncNotifySoftObjectChange(java.util.List,java.lang.String)

java.lang.RuntimeException: null
四、Spring 自定义Executor与自定义异步异常处理
需要实现AsyncConfigurer接口,可以看到Spring要我们配合EnableAsync与Configuration注解同时使用
/**
 * Interface to be implemented by @{@link org.springframework.context.annotation.Configuration
 * Configuration} classes annotated with @{@link EnableAsync} that wish to customize the
 * {@link Executor} instance used when processing async method invocations or the
 * {@link AsyncUncaughtExceptionHandler} instance used to process exception thrown from
 * async method with {@code void} return type.
 *
 * <p>Consider using {@link AsyncConfigurerSupport} providing default implementations for
 * both methods if only one element needs to be customized. Furthermore, backward compatibility
 * of this interface will be insured in case new customization options are introduced
 * in the future.
 *
 * <p>See @{@link EnableAsync} for usage examples.
 *
 * @author Chris Beams
 * @author Stephane Nicoll
 * @since 3.1
 * @see AbstractAsyncConfiguration
 * @see EnableAsync
 * @see AsyncConfigurerSupport
 */
public interface AsyncConfigurer {

	/**
	 * The {@link Executor} instance to be used when processing async
	 * method invocations.
	 */
	@Nullable
	default Executor getAsyncExecutor() {
		return null;
	}

	/**
	 * The {@link AsyncUncaughtExceptionHandler} instance to be used
	 * when an exception is thrown during an asynchronous method execution
	 * with {@code void} return type.
	 */
	@Nullable
	default AsyncUncaughtExceptionHandler getAsyncUncaughtExceptionHandler() {
		return null;
	}

}
demo,如下改造
java
@Configuration
@EnableAsync
public class TaskAsyncConfig implements AsyncConfigurer {

    @Override
    public Executor getAsyncExecutor() {
        ThreadPoolTaskExecutor executor = new ThreadPoolTaskExecutor();
        //定制线程名称,还可以定制线程group
        executor.setThreadFactory(new ThreadFactory() {
            private final AtomicInteger threadNumber = new AtomicInteger(1);

            @Override
            public Thread newThread(Runnable r) {
                //重新定义一个名称
                Thread t = new Thread(Thread.currentThread().getThreadGroup(), r,
                        "async-task-all" + threadNumber.getAndIncrement(),
                        0);
                return t;
            }
        });
        executor.setCorePoolSize(10);
        executor.setMaxPoolSize(20);
        executor.setKeepAliveSeconds(5);
        executor.setQueueCapacity(100);
        executor.initialize();
        return executor;
    }

    @Override
    public AsyncUncaughtExceptionHandler getAsyncUncaughtExceptionHandler() {
        return new AsyncUncaughtExceptionHandler() {
            @Override
            public void handleUncaughtException(Throwable ex, Method method, Object... params) {
                System.out.println("do exception by myself");
            }
        };
    }

}
记住,此时,Spring就不会替我们管理Executor了,需要我们自己初始化
java
executor.initialize();java
/**
 * Set up the ExecutorService.
 */
public void initialize() {
	if (logger.isInfoEnabled()) {
		logger.info("Initializing ExecutorService" + (this.beanName != null ? " '" + this.beanName + "'" : ""));
	}
	if (!this.threadNamePrefixSet && this.beanName != null) {
		setThreadNamePrefix(this.beanName + "-");
	}
	this.executor = initializeExecutor(this.threadFactory, this.rejectedExecutionHandler);
}
java
/**
 * Note: This method exposes an {@link ExecutorService} to its base class
 * but stores the actual {@link ThreadPoolExecutor} handle internally.
 * Do not override this method for replacing the executor, rather just for
 * decorating its {@code ExecutorService} handle or storing custom state.
 */
@Override
protected ExecutorService initializeExecutor(
		ThreadFactory threadFactory, RejectedExecutionHandler rejectedExecutionHandler) {

	BlockingQueue<Runnable> queue = createQueue(this.queueCapacity);

	ThreadPoolExecutor executor;
	if (this.taskDecorator != null) {
		executor = new ThreadPoolExecutor(
				this.corePoolSize, this.maxPoolSize, this.keepAliveSeconds, TimeUnit.SECONDS,
				queue, threadFactory, rejectedExecutionHandler) {
			@Override
			public void execute(Runnable command) {
				Runnable decorated = taskDecorator.decorate(command);
				if (decorated != command) {
					decoratedTaskMap.put(decorated, command);
				}
				super.execute(decorated);
			}
		};
	}
	else {
		executor = new ThreadPoolExecutor(
				this.corePoolSize, this.maxPoolSize, this.keepAliveSeconds, TimeUnit.SECONDS,
				queue, threadFactory, rejectedExecutionHandler);

	}

	if (this.allowCoreThreadTimeOut) {
		executor.allowCoreThreadTimeOut(true);
	}

	this.threadPoolExecutor = executor;
	return executor;
}
五、优雅地关闭自定义的线程池
由于在应用关闭的时候异步任务还在执行,导致类似 数据库连接池 这样的对象一并被 销毁了。当 异步任务 中对 数据库 操作就会出错。
解决方案如下,重新设置线程池配置对象,新增线程池 setWaitForTasksToCompleteOnShutdown() 和 setAwaitTerminationSeconds() 配置:
java
@Bean("taskExecutor")
public Executor taskExecutor() {
    ThreadPoolTaskScheduler executor = new ThreadPoolTaskScheduler();
    executor.setPoolSize(20);
    executor.setThreadNamePrefix("taskExecutor-");
    executor.setWaitForTasksToCompleteOnShutdown(true);
    executor.setAwaitTerminationSeconds(60);
    return executor;
}setWaitForTasksToCompleteOnShutdown(true): 该方法用来设置 线程池关闭 的时候 等待 所有任务都完成后,再继续 销毁 其他的 Bean。这样这些 异步任务 的 销毁 就会先于 数据库连接池对象 的销毁。
setAwaitTerminationSeconds(60): 该方法用来设置线程池中 任务的等待时间。如果超过这个时间还没有销毁就 强制销毁,以确保应用最后能够被关闭,而不是阻塞住。
六、异步回调使用示例
定义异步方法,使用Future<T>来返回异步调用的结果
java
@Async
public Future<String> firstTask() throws InterruptedException {
	System.out.println("开始做任务一");
	long start = System.currentTimeMillis();
	Thread.sleep(random.nextInt(10000));
	long end = System.currentTimeMillis();
	System.out.println("完成任务一,当前线程:" + Thread.currentThread().getName() + ",耗时:" + (end - start) + "毫秒");
	return new AsyncResult<>("任务一完成");
}

@Async
public Future<String> secondTask() throws InterruptedException {
	System.out.println("开始做任务二");
	long start = System.currentTimeMillis();
	Thread.sleep(random.nextInt(10000));
	long end = System.currentTimeMillis();
	System.out.println("完成任务二,当前线程:" + Thread.currentThread().getName() + ",耗时:" + (end - start) + "毫秒");
	return new AsyncResult<>("任务二完成");
}

@Async
public Future<String> thirdTask() throws InterruptedException {
	System.out.println("开始做任务三");
	long start = System.currentTimeMillis();
	Thread.sleep(random.nextInt(10000));
	long end = System.currentTimeMillis();
	System.out.println("完成任务三,当前线程:" + Thread.currentThread().getName() + ",耗时:" + (end - start) + "毫秒");
	return new AsyncResult<>("任务三完成");
}
调用过程
java
@GetMapping("test-future")
public void testFuture() {
	try {
		Future<String> result1 = asyncService.firstTask();
		Future<String> result2 = asyncService.secondTask();
		Future<String> result3 = asyncService.thirdTask();
		while (true) {
			if (result1.isDone() && result2.isDone() && result3.isDone()) {
				System.out.println("执行异步回调");
				break;
			}
		}
		System.out.println("异步回调结束");
	} catch (InterruptedException e) {
		e.printStackTrace();
	}
}
调用结果
java
开始做任务一
开始做任务二
开始做任务三
完成任务二,当前线程:task-2,耗时:896毫秒
完成任务一,当前线程:task-1,耗时:7448毫秒
完成任务三,当前线程:task-3,耗时:7901毫秒
执行异步回调
异步回调结束